

How to Set Up Your Subwoofer: A Practical Guide
February 08, 2026
Contents
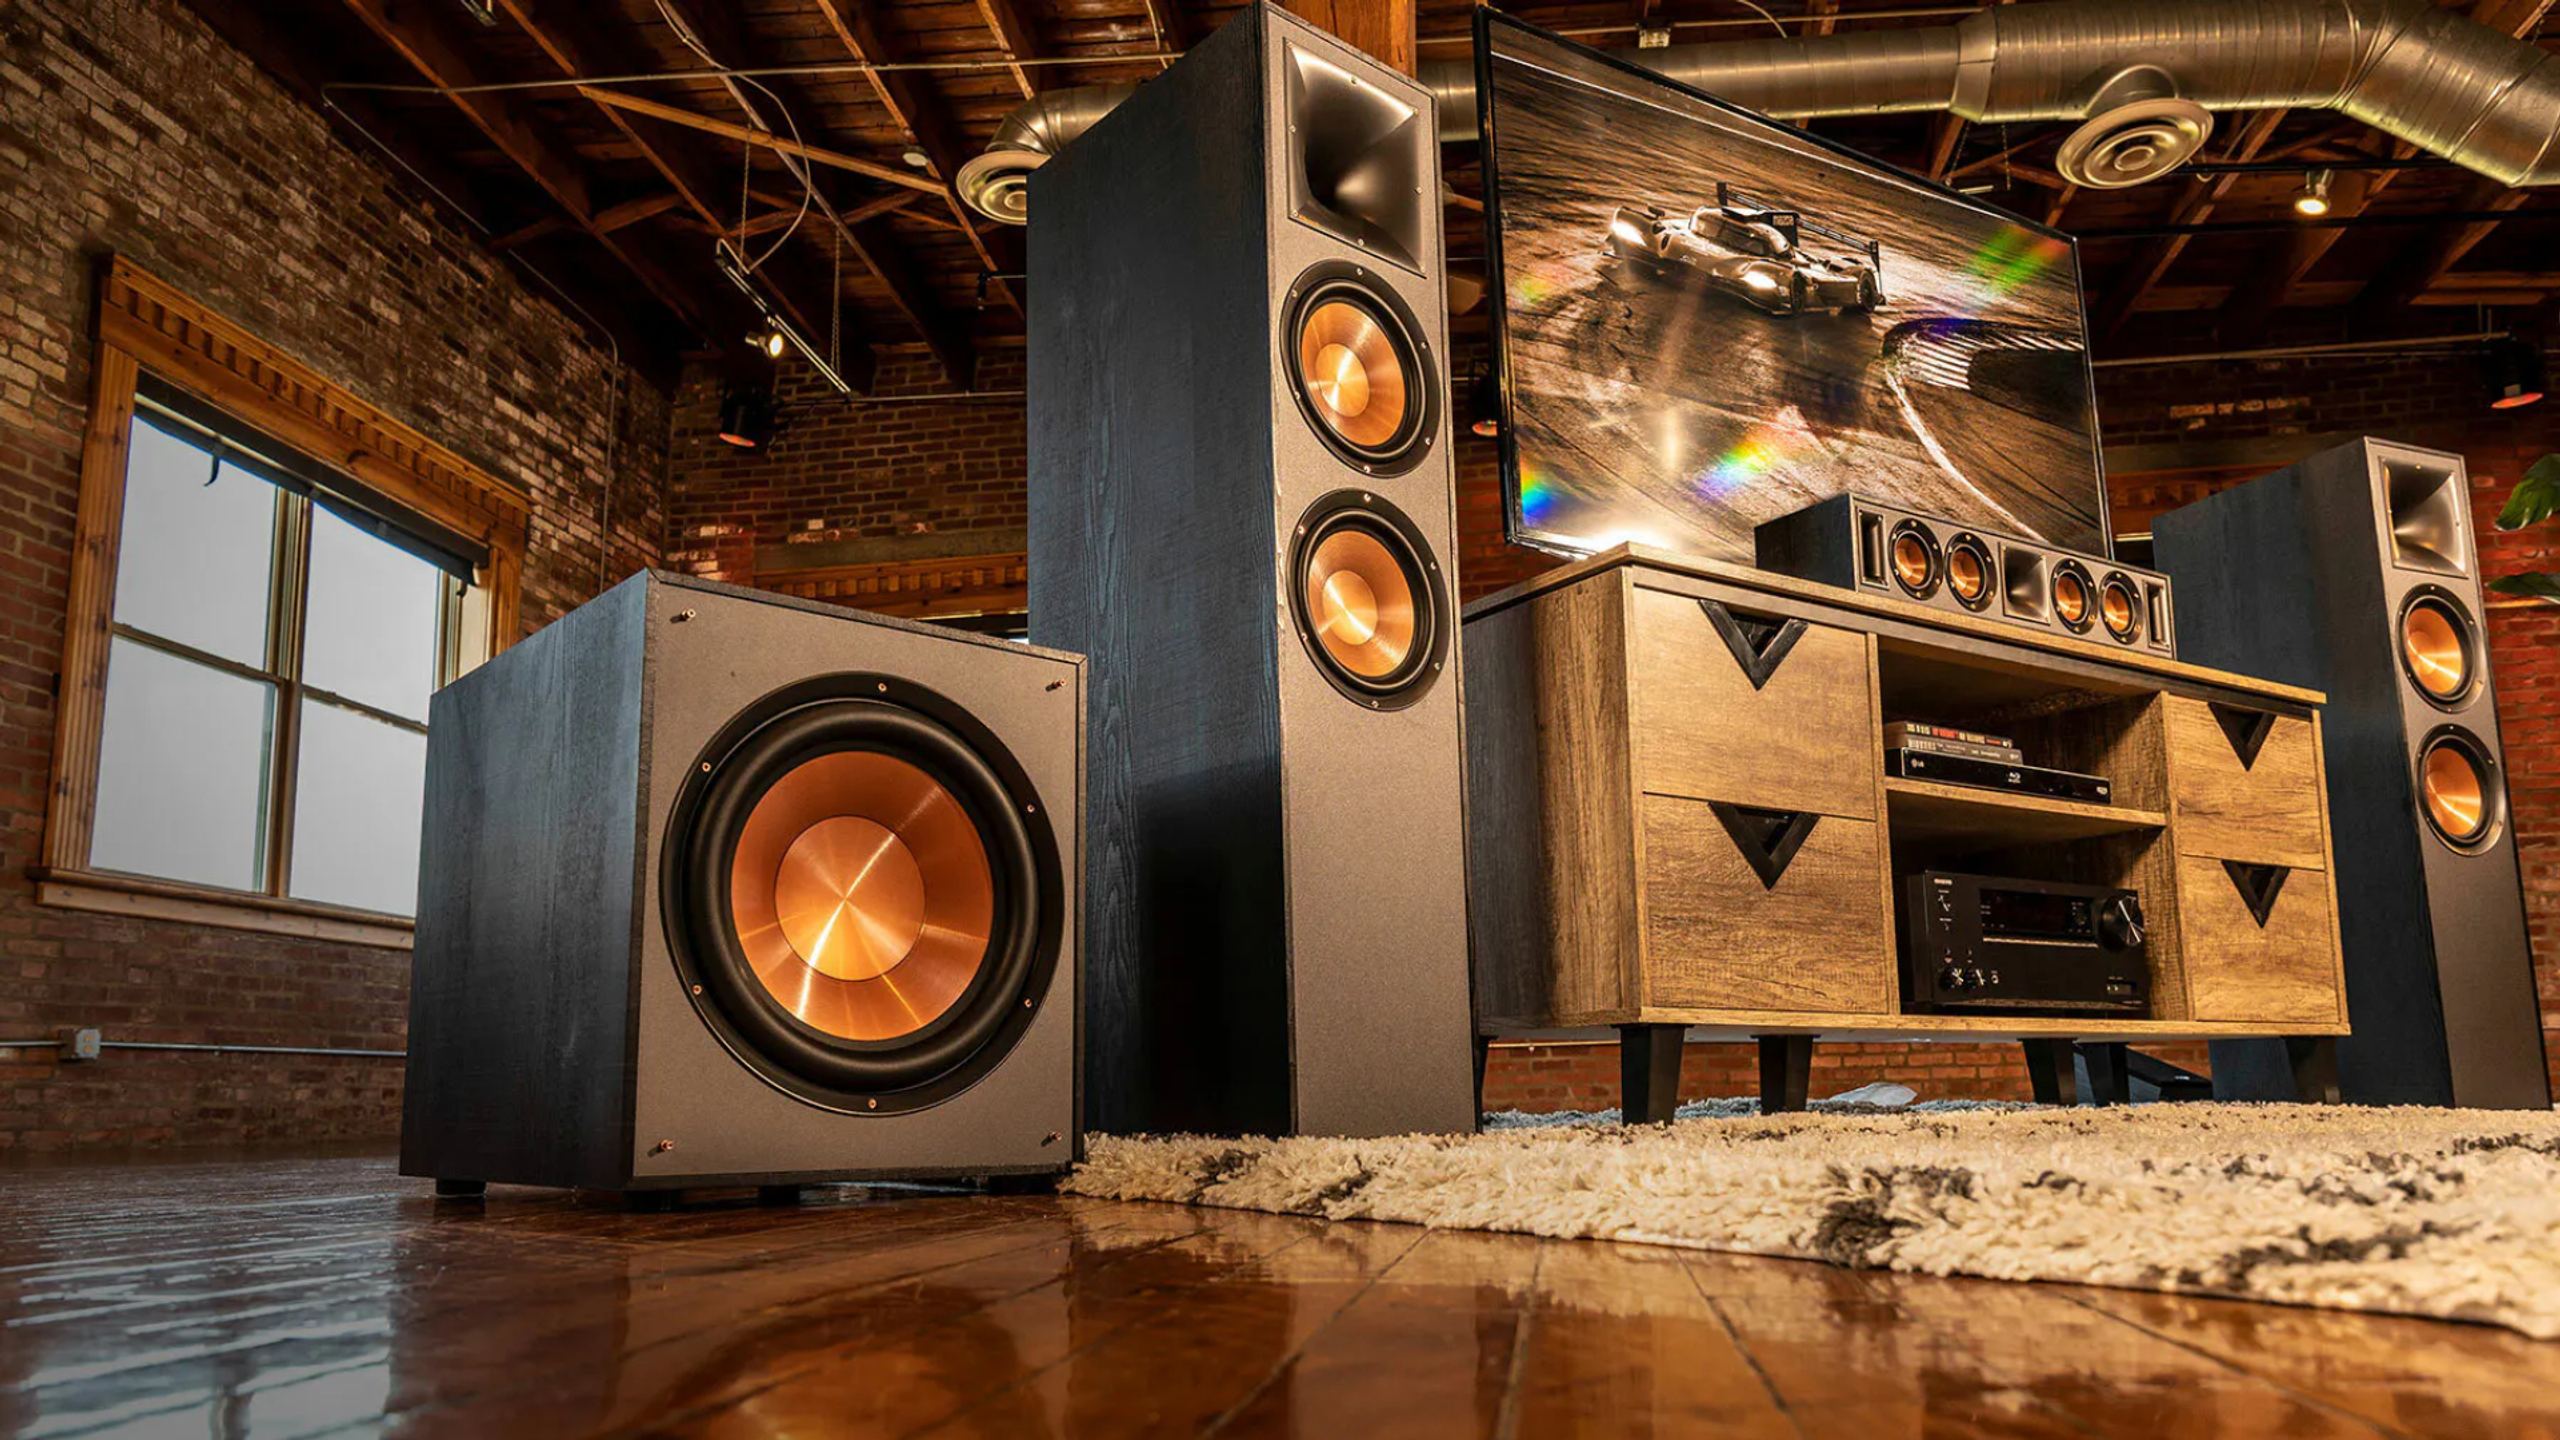
The subwoofer stands proudly in a corner of the room, but the result is underwhelming. The bass sounds exaggerated, sometimes it disappears completely in certain parts of the living room, or the subwoofer doesn’t blend well with the speakers. Tuning a subwoofer for home cinema or hi‑fi follows a simple logic: placement first, electronic adjustments second. This guide explains how to set up your subwoofer in four concrete steps to obtain precise, musical bass.
A poorly tuned subwoofer produces boomy, overbearing bass rather than a solid, well‑defined foundation. A well‑integrated sub, on the other hand, should be imperceptible as a distinct source. You don’t hear it as such: you feel that the music or movie has a grounding that enriches the whole without ever drawing attention to itself.
Subwoofer placement: finding the optimal position
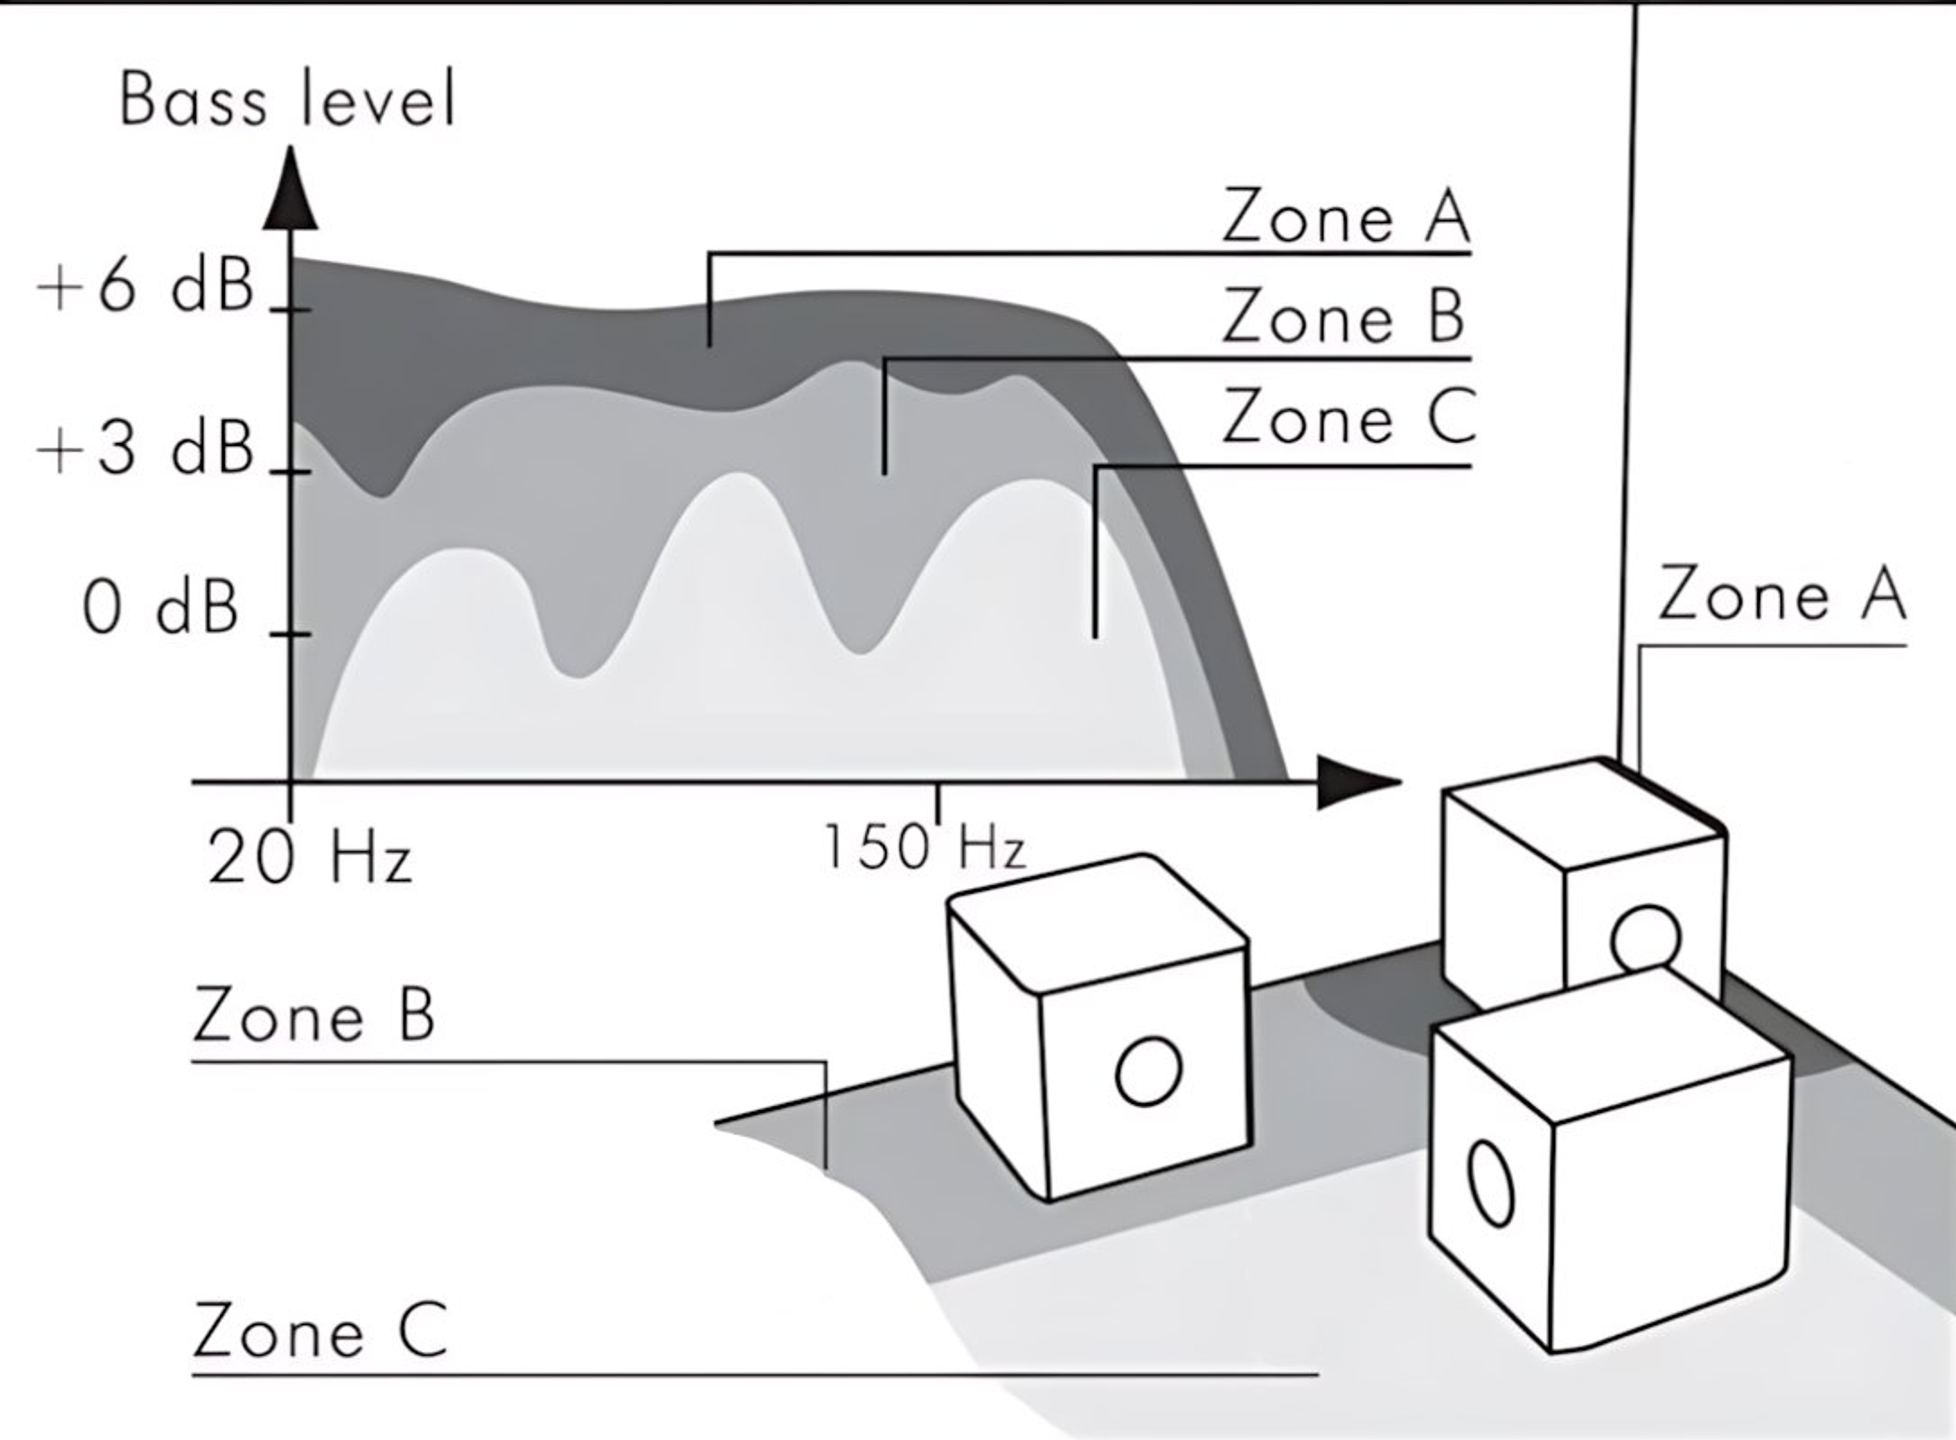
The position of the subwoofer has a greater influence on bass quality than any electronic setting. Low frequencies behave differently from mids and highs: their wavelengths can reach several meters and interact strongly with the dimensions of the room. This interaction creates room modes, areas where certain frequencies are reinforced (peaks) or cancelled (nulls).
Corner placement: pros and cons
Placing a subwoofer in a corner mechanically amplifies the bass. The walls and floor act as reflective surfaces that increase the perceived level, with up to 6 dB of gain per nearby surface. This boost may seem appealing, but it often comes with imprecise, boomy bass. The corner excites all the room modes simultaneously, which blurs definition.
For most rooms, a reasonable compromise is to place the subwoofer on the same wall as the main speakers, about one third of the distance from the corner. Moving the sub 30 to 45 cm away from the back wall reduces excessive bass build‑up and improves clarity.
Subwoofer crawl method for testing placement
This slightly odd method works remarkably well. The principle is based on the acoustic reciprocity theorem: if you place the subwoofer where your head usually is and then move around the room, the bass variations you perceive correspond to what you would hear from your seat with the subwoofer placed at each location you test.
Proceed as follows: temporarily place the subwoofer on your sofa or usual armchair, preferably at ear height (on a coffee table, for example). Play music with sustained bass content or a test tone at 80 Hz. Crawl on all fours through the areas where you could install the subwoofer, keeping your head close to the floor.
Identify the spots where the bass sounds the most even, neither bloated nor thin. Then test these positions by actually placing the subwoofer there. This empirical technique yields better results than any theoretical calculation when it comes to compensating for the specific acoustics of your room.
Setting the subwoofer crossover frequency
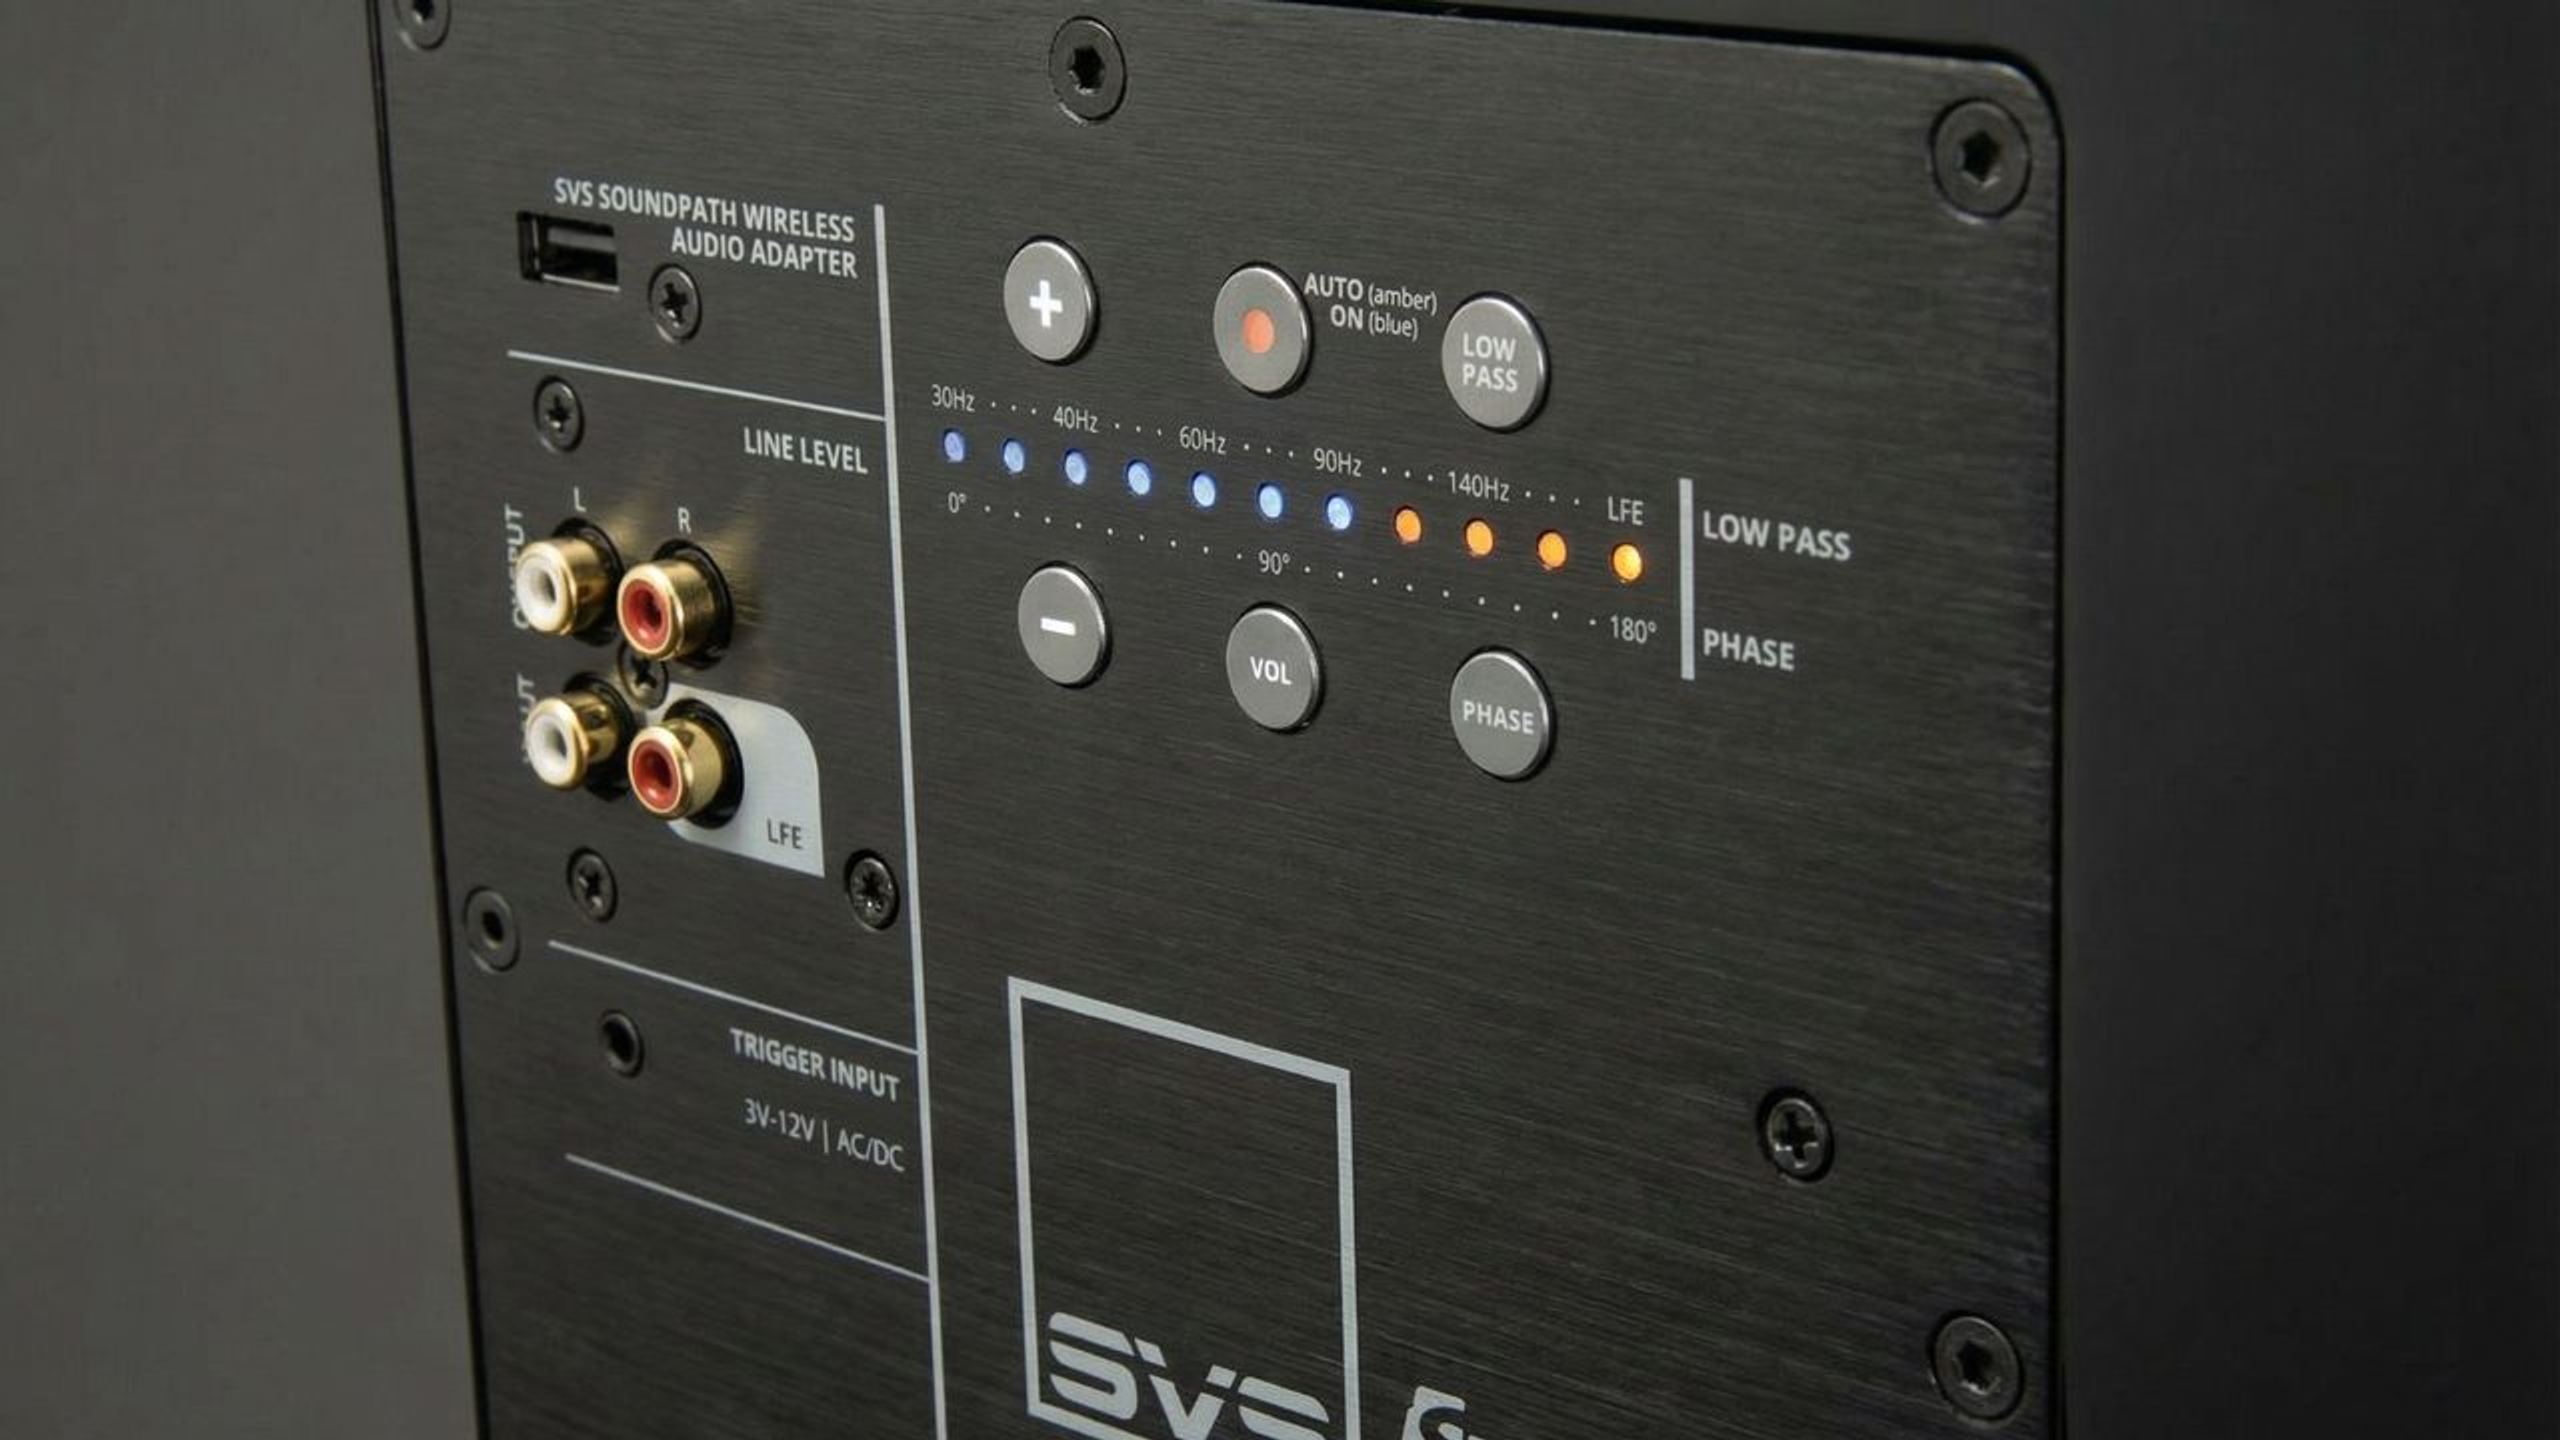
The crossover frequency determines the transition point between the subwoofer and the main speakers. Below this frequency, the subwoofer takes over. Above it, the speakers handle reproduction. This setting governs the integration between the two systems.
The THX 80 Hz standard
The 80 Hz recommendation is a valid starting point for most setups. This choice is a compromise between two constraints: relieving the speakers of bass reproduction (which lets them play louder with less distortion) and avoiding making the subwoofer locatable (frequencies below 80 Hz are difficult for the human ear to localize).
Adapting the crossover to your speakers
The setting depends on the capabilities of your main speakers. Compact bookshelf speakers whose response rolls off around 100 Hz benefit from a crossover at 100–120 Hz, sometimes more for small satellites (up to 150–200 Hz). Floorstanders with 16 to 20 cm woofers can manage with a crossover at 60–80 Hz. Large floorstanding speakers with 20 cm woofers or more can sometimes go down to 40–60 Hz.
| Type of speaker | Woofer size | Recommended crossover frequency | Justification |
|---|---|---|---|
| Compact satellites | < 10 cm | 150–200 Hz | Limited low‑frequency extension |
| Bookshelf speakers | 10–13 cm | 100–120 Hz | Response rolls off around 100 Hz |
| Medium floorstanders | 16–20 cm | 60–80 Hz | THX standard, good compromise |
| Large floorstanders | > 20 cm | 40–60 Hz | Good natural low‑frequency extension |
A practical rule of thumb is to set the crossover about 10 Hz above the lowest frequency your speakers can reproduce cleanly. This safety margin ensures a smooth transition without a dip in the response and avoids asking the speakers to handle frequencies they struggle to reproduce.
Avoiding double filtering
Beware the pitfall of double filtering: enabling both the AV receiver’s crossover and the subwoofer’s internal crossover attenuates the signal too much. Most AV receivers include a crossover filter for the subwoofer. The subwoofer itself usually has its own crossover control. Using both means filtering the signal twice, which causes excessive attenuation and an overly steep roll‑off.
The simplest configuration: disable the subwoofer’s filter (“bypass”, “LFE” or “direct” position) and let the receiver manage the crossover. If the subwoofer is connected to a stereo system without a dedicated subwoofer output, then the sub’s internal crossover takes over.
Setting the subwoofer phase
Phase represents the timing offset between the signals from the subwoofer and the speakers. When the sub and speakers play together at the crossover frequency, their waves can add up (in phase) or partially cancel each other (out of phase). Poor phase alignment creates hollow, lagging, or time‑smeared bass.
The 0°/180° switch
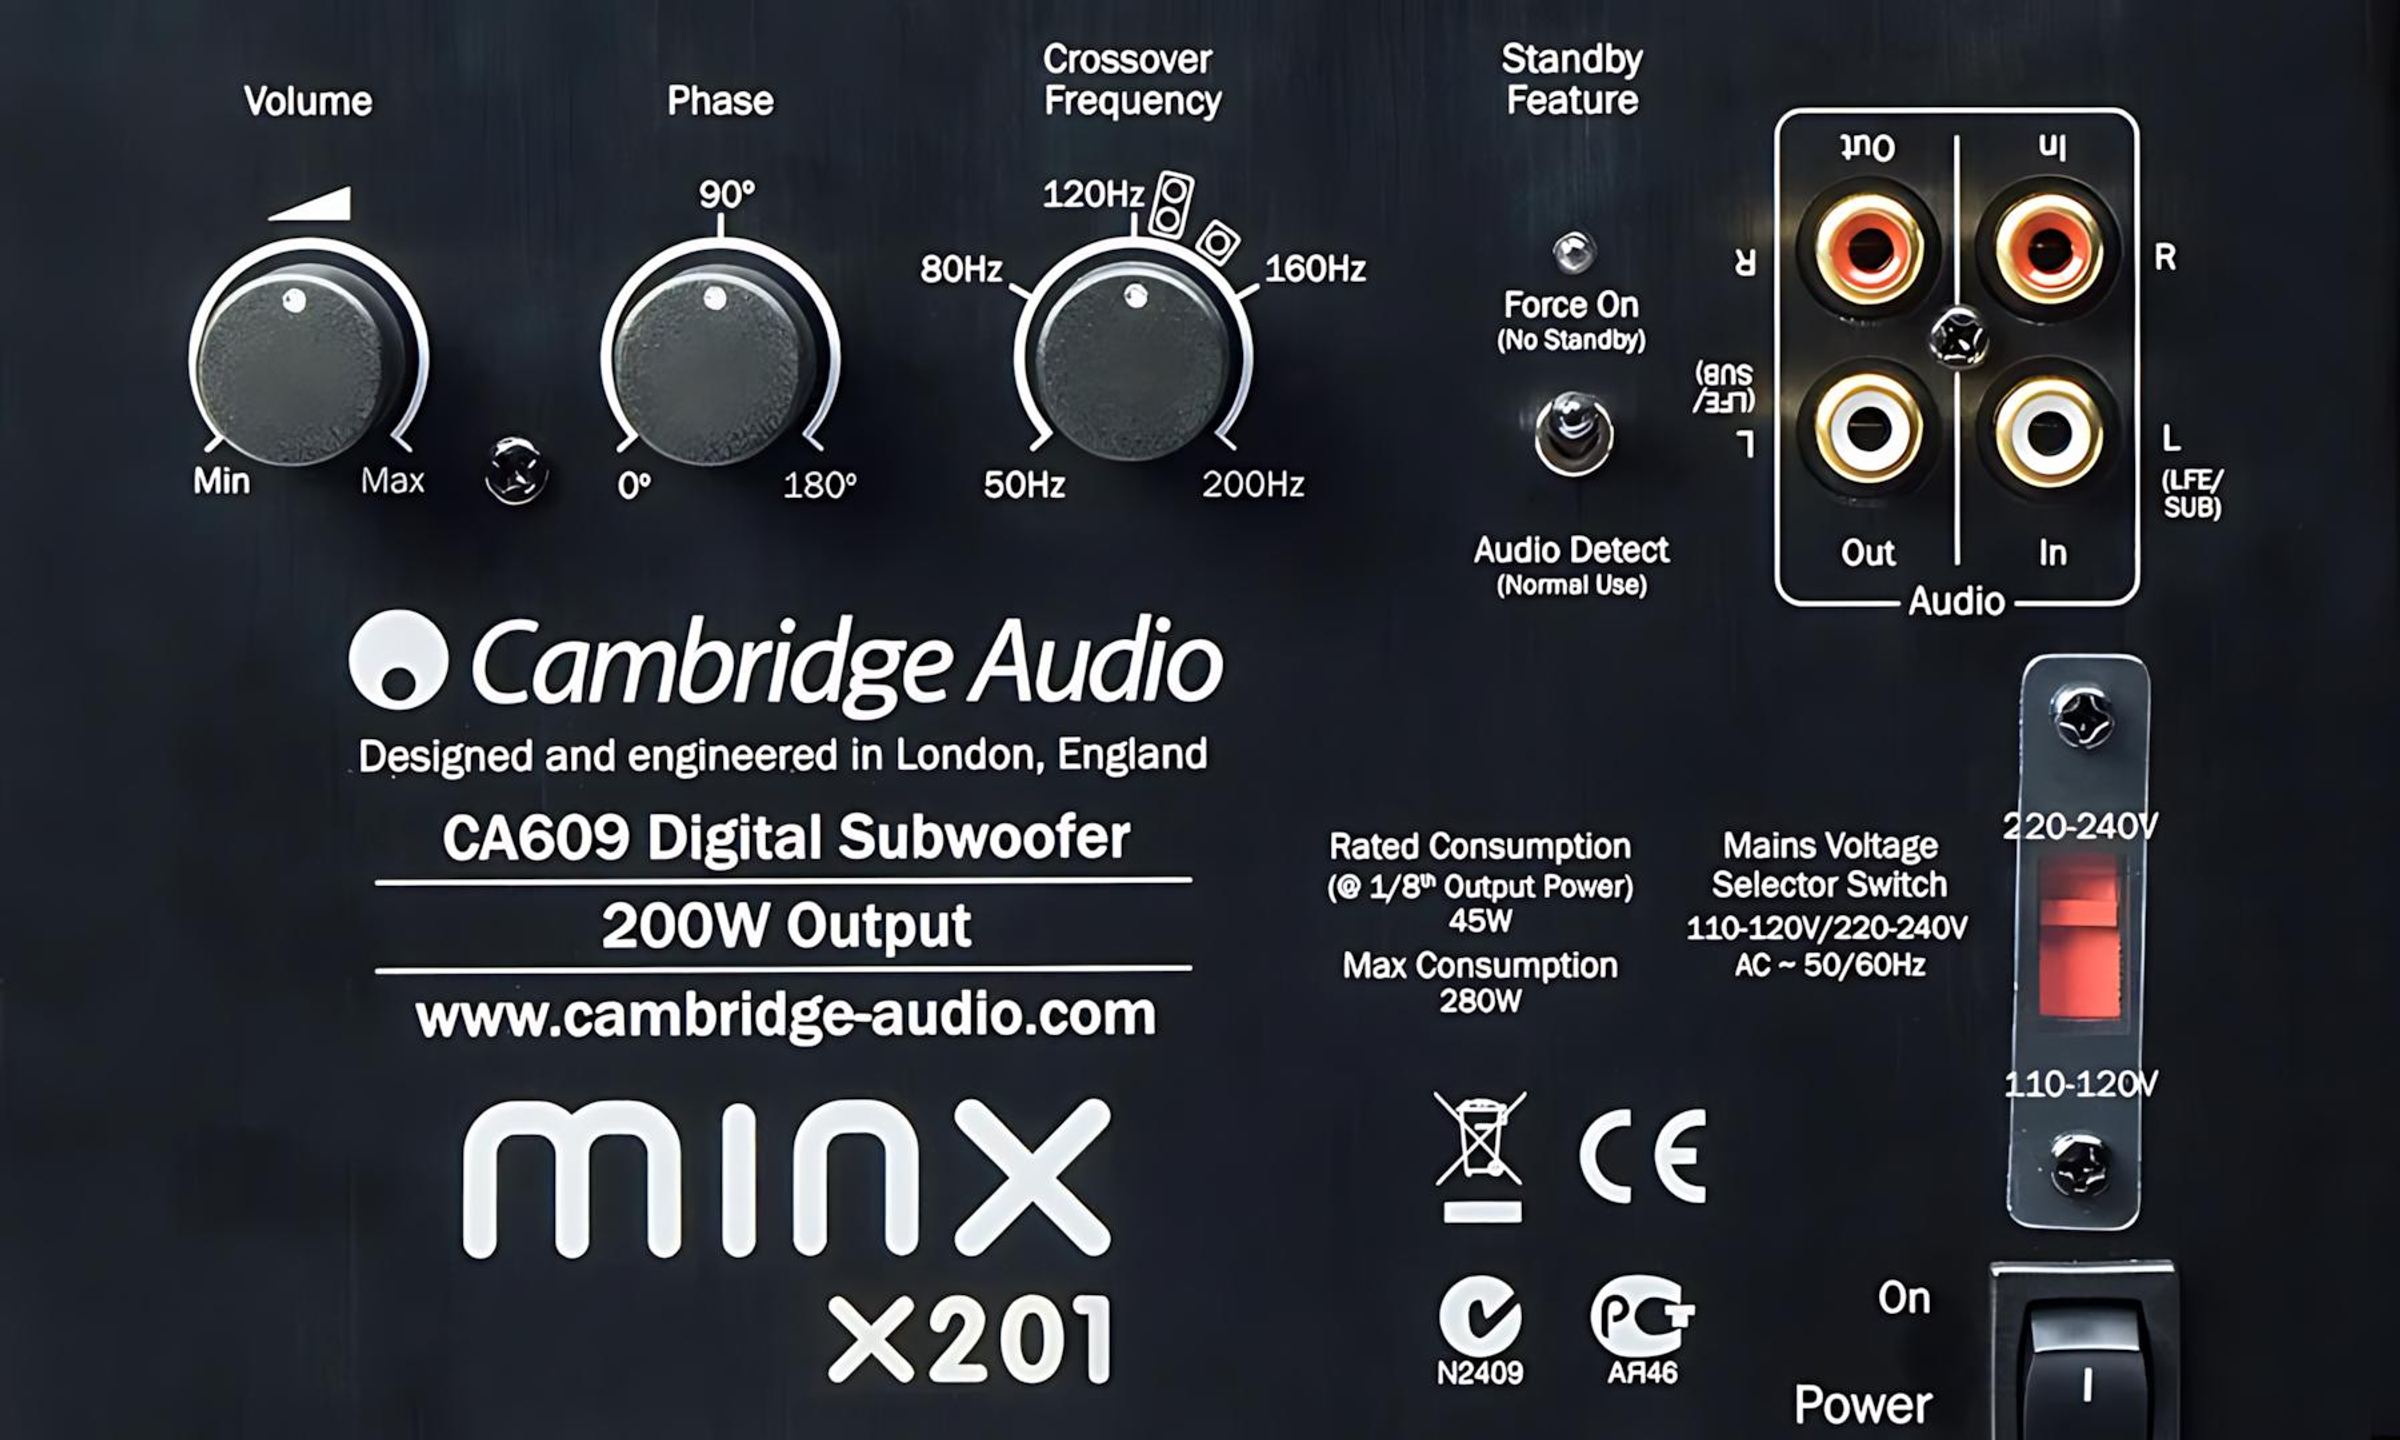
The simplest case: a switch that toggles between 0° and 180°. Play a music passage or movie scene with bass content around the crossover frequency. Try both positions. The one that produces fuller, more present bass is generally correct.
If the subwoofer is on the same plane as the front speakers and at a similar distance from the listening position, 0° is usually appropriate. If the sub is set back or placed differently, 180° may offer better integration.
Variable phase from 0° to 180°
Some subwoofers offer a dial for fine phase adjustment. This control acts as a variable time delay, allowing you to compensate for distance differences between the subwoofer and the speakers.
Method: play a test tone at the crossover frequency (for example 80 Hz if your crossover is set to 80 Hz), then slowly turn the phase knob while another person listens from the main listening position. The optimal position corresponds to the highest sound level, indicating that the subwoofer and speakers are in phase and their contributions are adding constructively.
Alternative: adjusting distance in the receiver
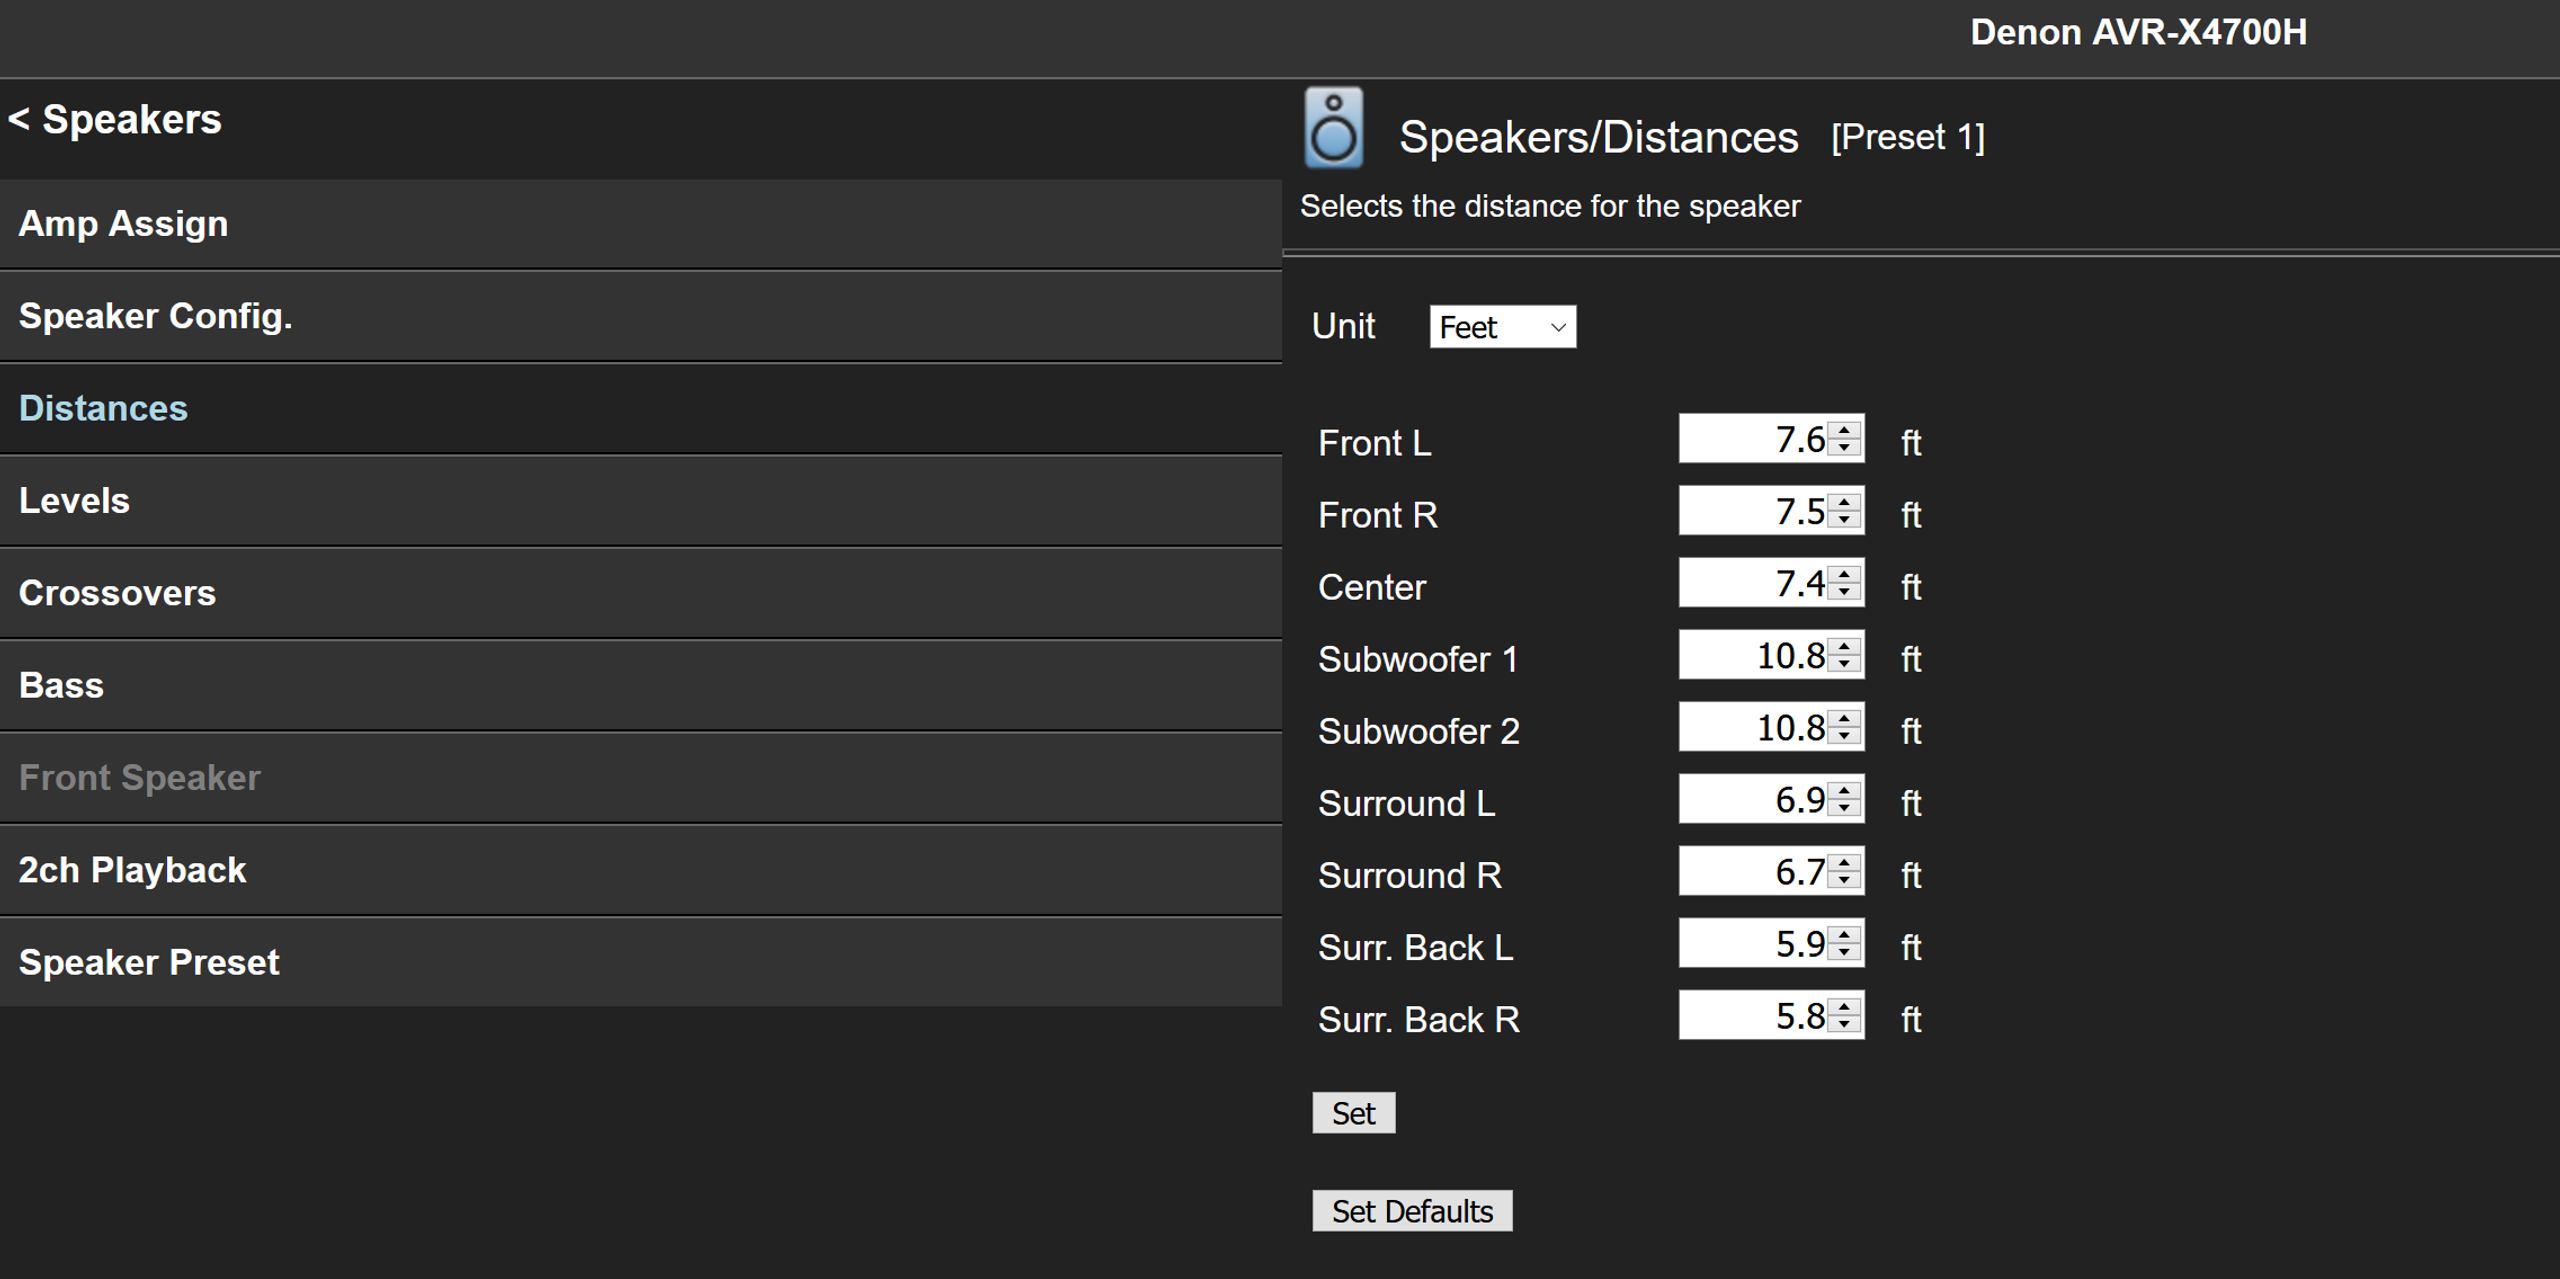
Modern AV receivers allow you to set the distance for each speaker, including the subwoofer. This parameter introduces a delay that compensates for sound propagation time. Changing the subwoofer distance in the receiver settings effectively adjusts its phase, with the advantage of making precise step‑by‑step changes from the listening seat.
If your receiver offers this feature, leave the subwoofer’s phase control at 0° and work only through the receiver’s menu. This approach is more precise and more comfortable, since it’s done from the listening position.
Adjusting subwoofer volume level
An overdriven subwoofer dominates the system and masks detail. An under‑levelled sub seems absent, depriving the music of its foundation. The balance lies between these extremes and depends on your system and your preferences.
Pink noise method
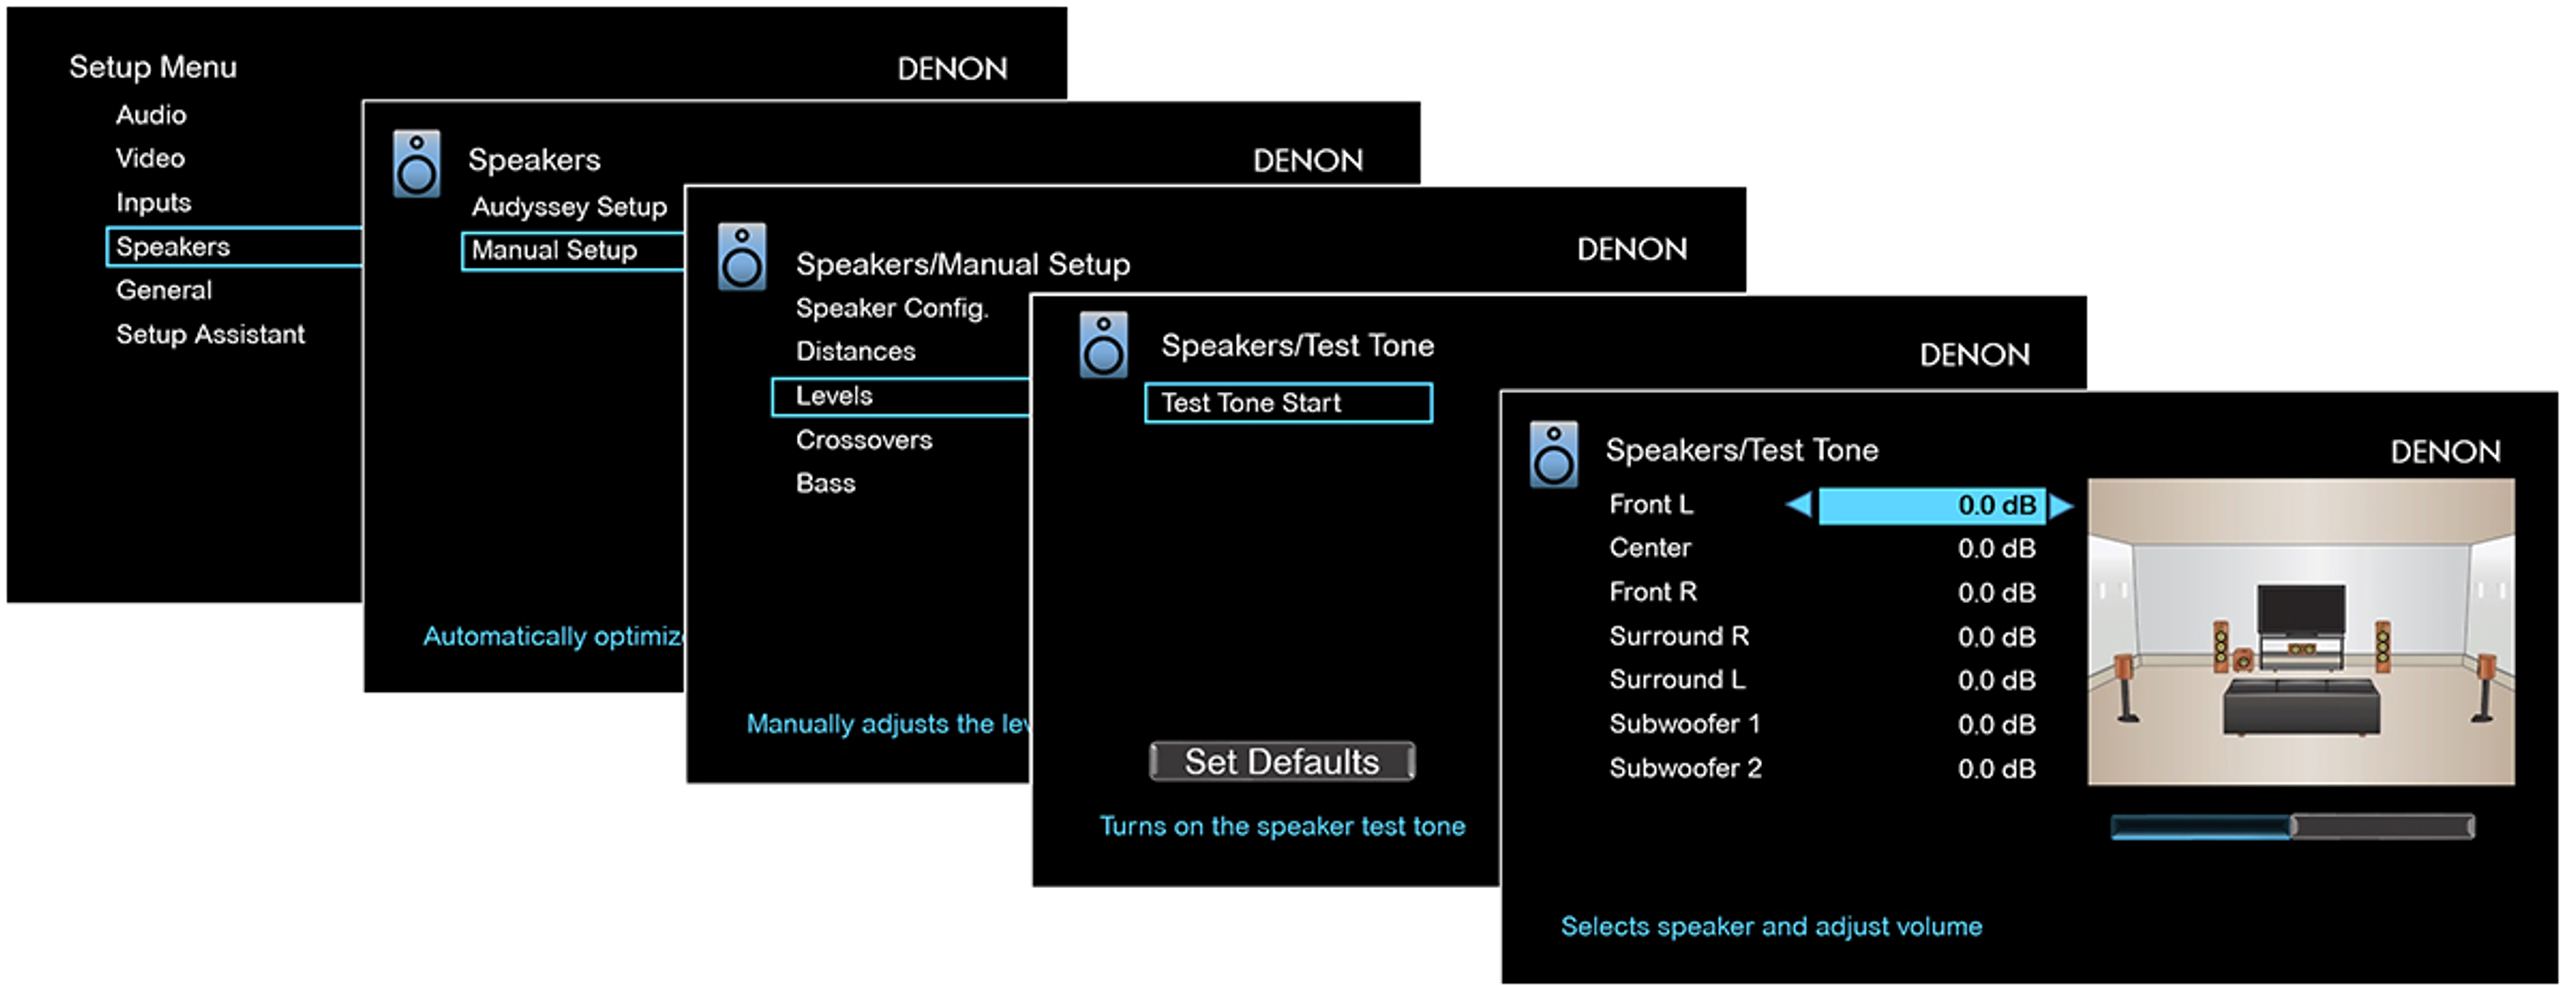
Most AV receivers include a calibration function with test tones. The goal: each channel should produce the same sound level at the listening position, typically 75 dB SPL. Adjust the subwoofer volume (“level” or “gain” knob) so that the test noise from the subwoofer channel seems as loud as that from the other speakers.
If your subwoofer has a rotary analog control, start at the halfway point (50%) before launching calibration. If the control is digital, start at -15 dB. These settings give the receiver enough headroom to set the level correctly during automatic setup.
Listening check
After calibration, test with music tracks you know well. The bass should sound natural, neither missing nor overwhelming. On an acoustic recording, a double bass or kick drum should feel present without overpowering everything else. In a movie, explosions gain impact, but dialogue remains intelligible.
A common mistake: turning up the subwoofer level because bass seems lacking at low volume. This phenomenon is due to the Fletcher–Munson curve (reduced sensitivity to bass at low listening levels). If you often listen at moderate volume, loudness compensation features (Dynamic EQ for Denon/Marantz, YPAO Volume for Yamaha) correct this more appropriately than simply boosting the subwoofer level.
Automatic calibration: Audyssey, YPAO and Dirac Live
Most modern AV receivers include some form of room correction: Audyssey (Denon, Marantz), YPAO (Yamaha), Dirac Live (some NAD models, Arcam, or via additional license), MCACC (Pioneer). These systems measure the room’s acoustic response and apply corrective filters.
What they do well
These systems automatically set distances, levels, and crossover frequencies. They tame the most obvious resonance peaks and attempt to smooth the frequency response. For an initial setup or for users not keen on manual tweaking, the result is usually satisfying and far superior to a rough, hand‑tuned configuration.
| System | Brands | Strengths | Limits |
|---|---|---|---|
| Audyssey | Denon, Marantz | Flat target curve, precise correction | Bass sometimes dry, often benefits from +2/3 dB adjustment |
| YPAO | Yamaha | Effective dynamic volume compensation | Less precise on deep nulls |
| Dirac Live | NAD, Arcam | Corrects phase and amplitude, very accurate | Extra cost on some models |
| MCACC | Pioneer | Fast, simple interface | Less refined correction than Audyssey |
Their limits
No digital processing can fully compensate for fundamentally bad placement. A deep null in the response (a room “null”) cannot be corrected by EQ without risking overloading the subwoofer’s amplifier. These systems are no substitute for proper consideration of placement, which is why it’s so important to start with the subwoofer crawl technique.
Another point: automatic settings don’t always match personal taste. Some users find the bass too dry after Audyssey calibration, since the system targets a very flat curve. Manually raising the subwoofer level by 2–3 dB after calibration is a common practice to achieve fuller, warmer bass without upsetting the overall balance.
Refining with measurements
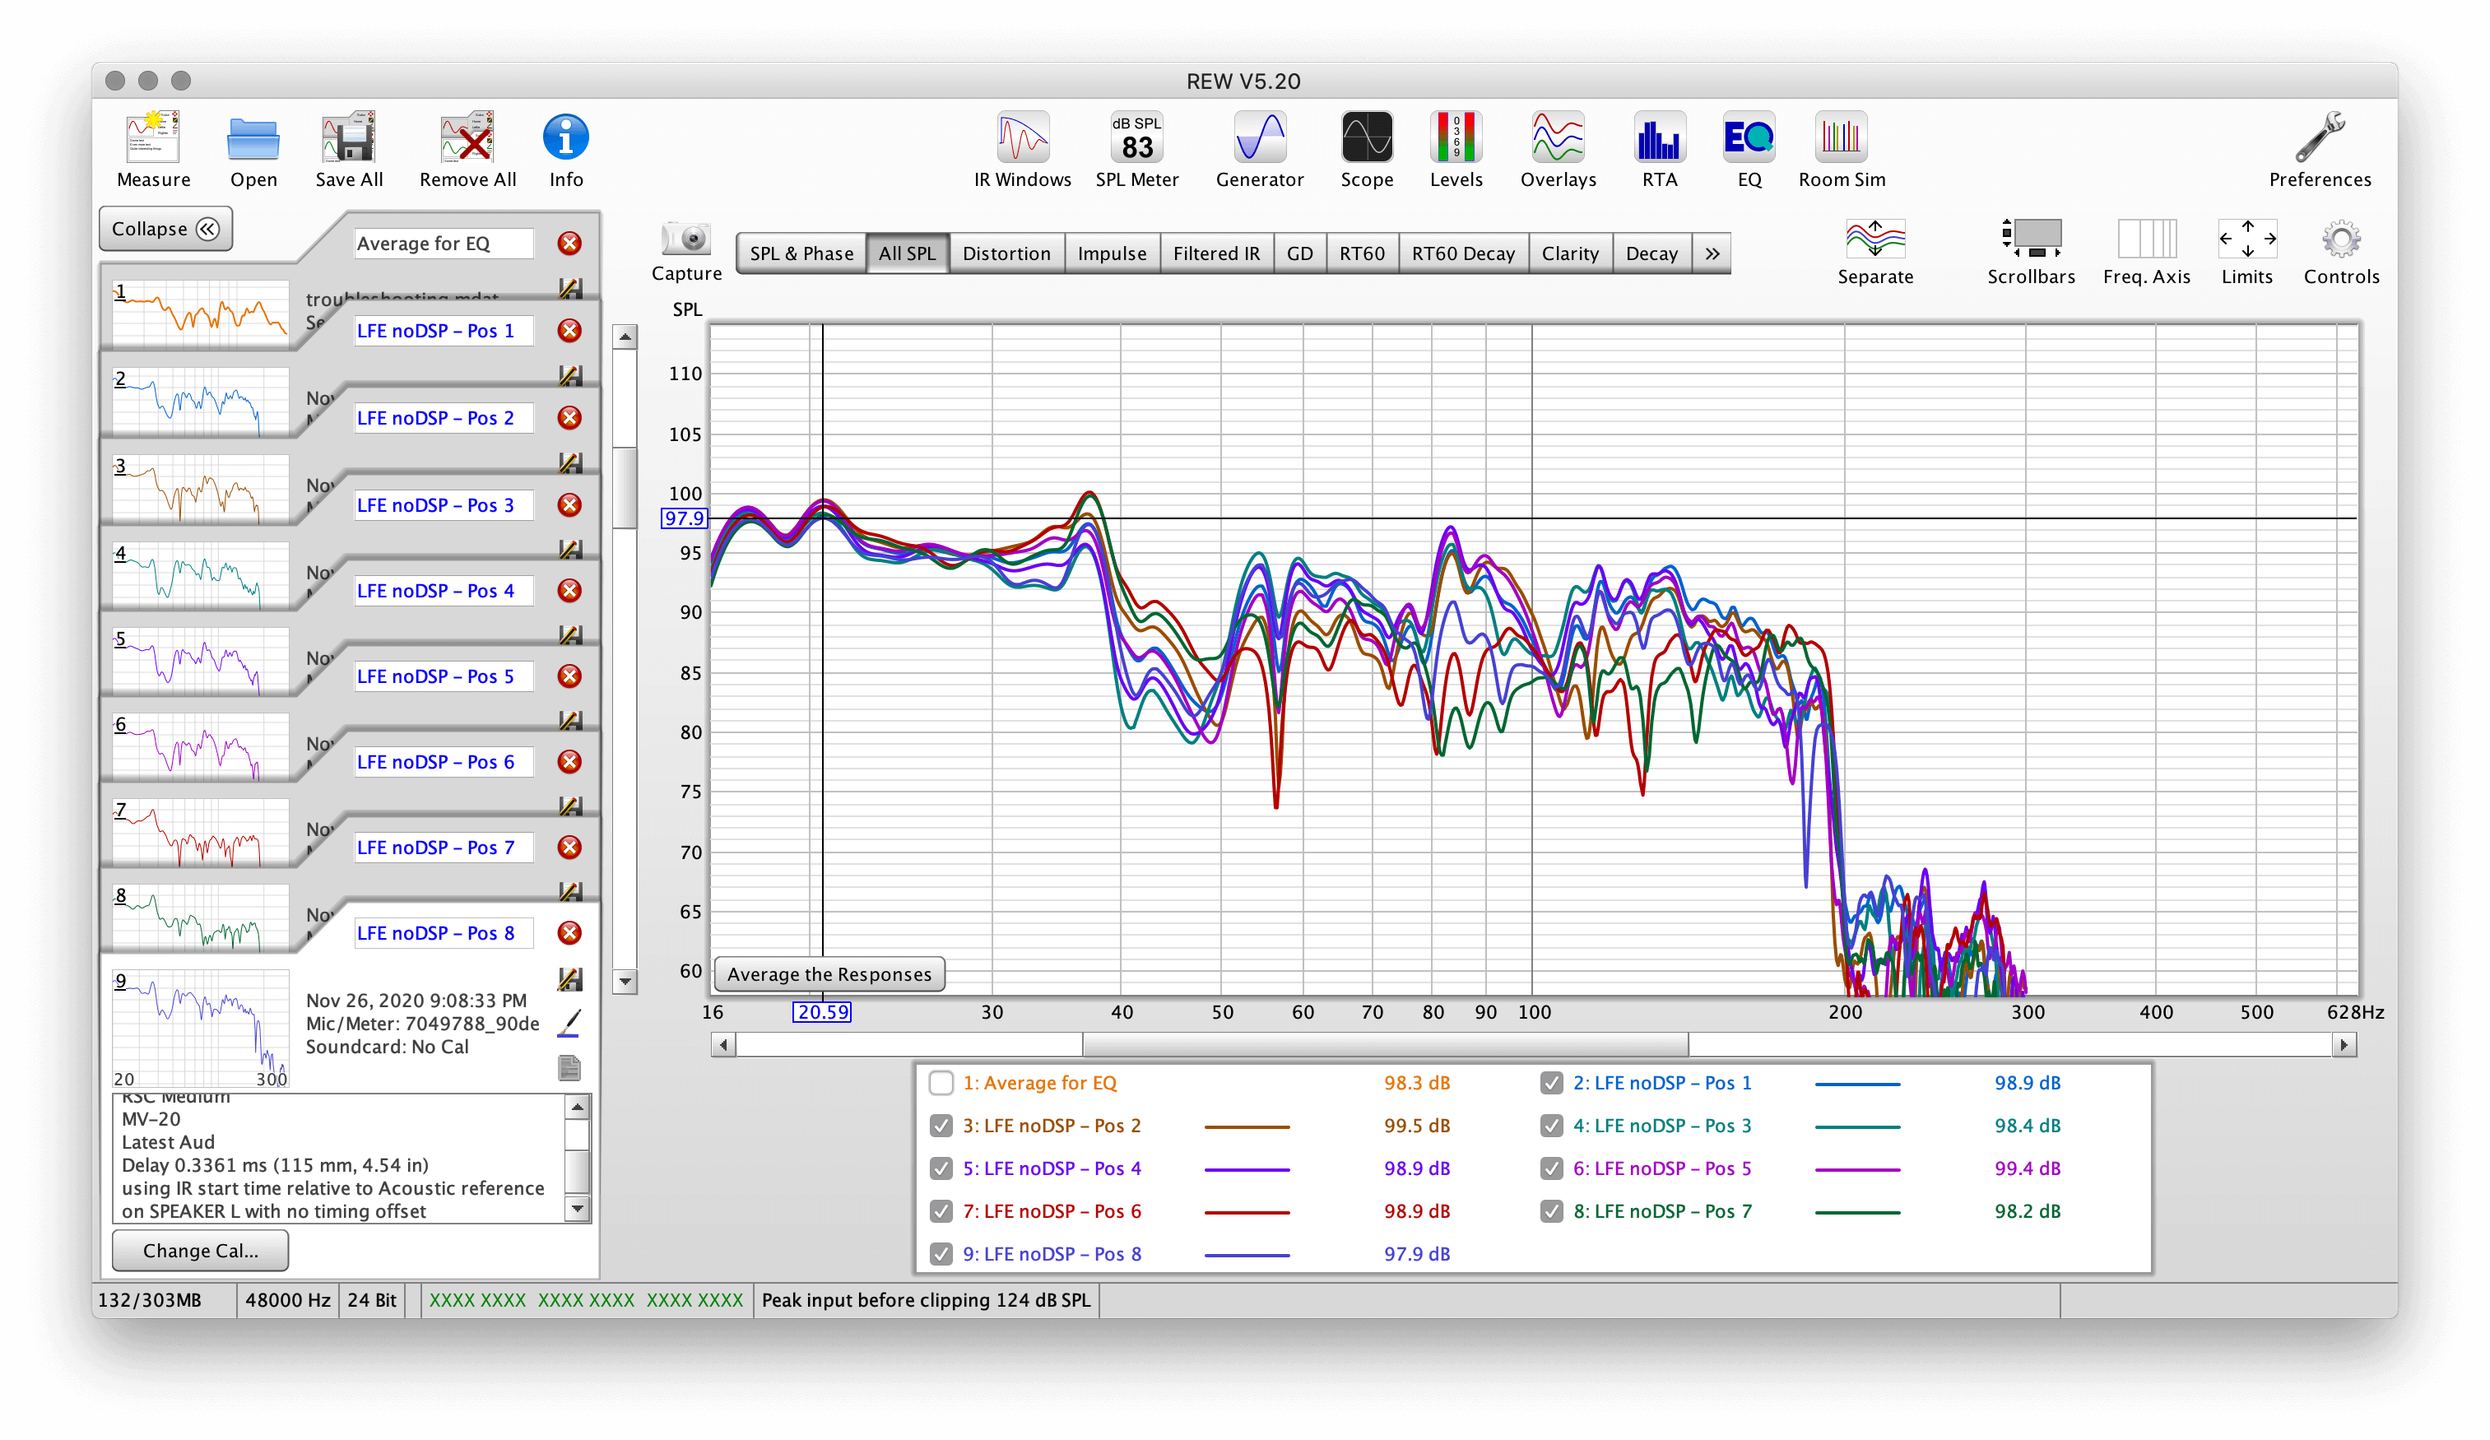
Enthusiasts go further by using measurement software such as REW (Room EQ Wizard), combined with a calibrated measurement mic (like the UMIK‑1). This approach lets you visualize the frequency response precisely, identify problematic peaks and nulls, and verify that the transition between subwoofer and speakers is smooth.
The time investment is significant, but the results reach a level of precision the ear alone cannot achieve. This method is suited to users who want to push optimization to the limit and who have the necessary tools and knowledge.
Dual subwoofers: benefits and optimal placement
With a single subwoofer, achieving even bass throughout an entire room is a matter of compromise. Room modes inevitably create areas where some frequencies dominate and others vanish. Adding a second, well‑placed sub smooths out these irregularities. Modal density increases, and more seats benefit from balanced bass.
Concrete acoustic benefits
Two subwoofers offer several advantages:
- Smoother frequency response across multiple listening positions
- Greater impact and dynamics without pushing the amplifiers as hard
- Improved stereo imaging in the low frequencies for hi‑fi setups
- Less precise localization of bass sources
- Two medium subwoofers often sound better than one large sub
Placement configurations
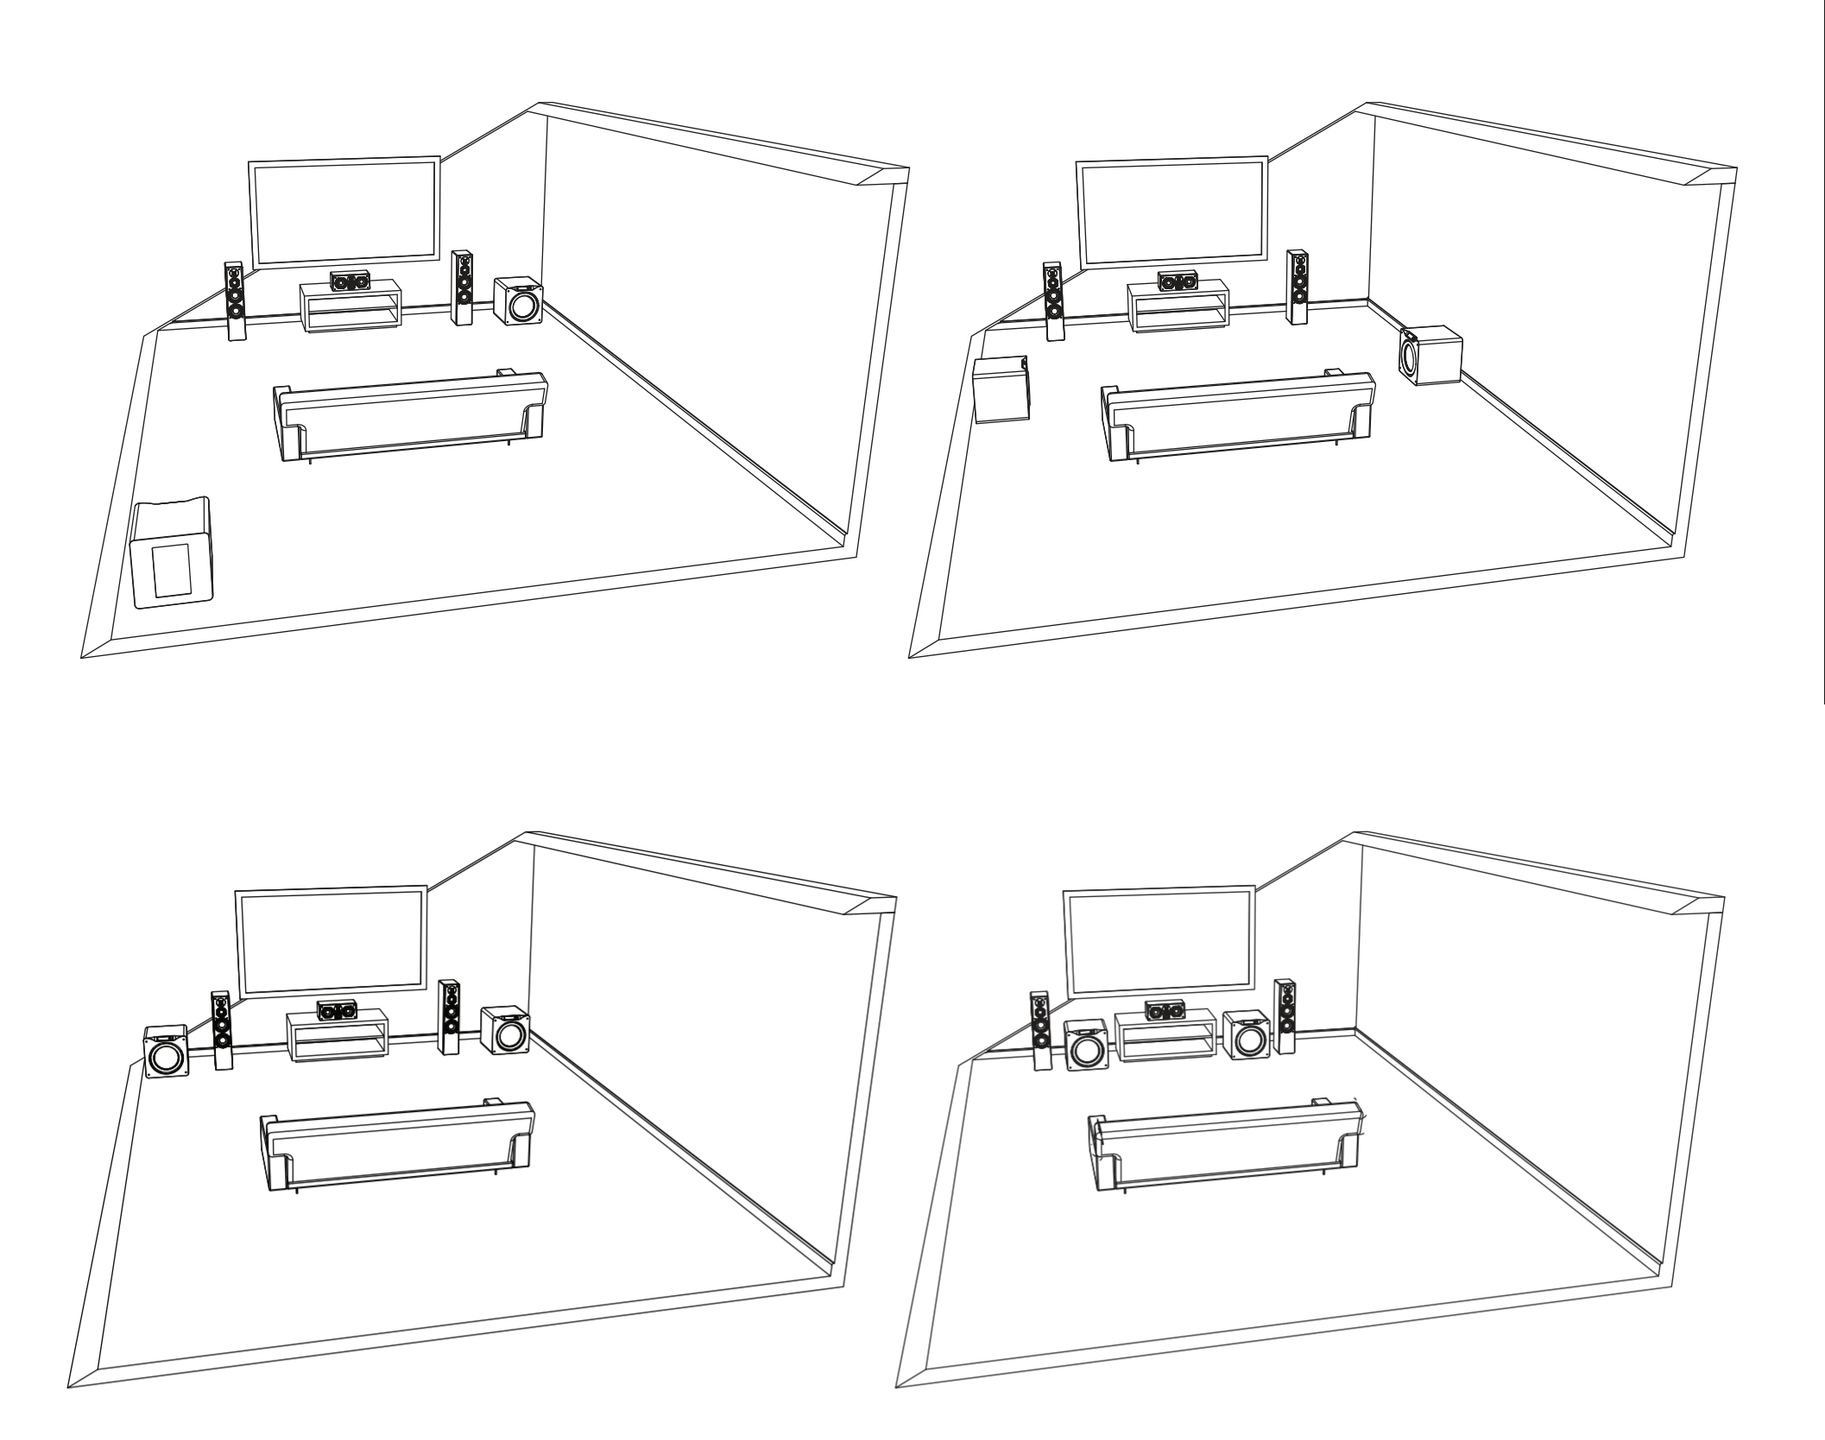
The ideal configuration: place each subwoofer at the midpoint of two opposing walls (for example, one in the center of the front wall, the other in the center of the rear wall). This layout offers the best linearity across all listening seats.
A practical alternative is to place both subwoofers at the ends of the front wall, on either side of the main system. This configuration improves stereo integration and remains visually coherent.
Calibrating a dual‑sub system
This setup requires careful calibration. The two subwoofers must play at the same level and, most importantly, in phase with each other. A timing offset between them would cancel out part of the benefits. Modern automatic calibration systems (Audyssey, Dirac Live) handle multi‑sub configurations effectively and greatly simplify setup.
The final test
Subwoofer setup follows a clear logic: placement first, electronic adjustments second. Finding the best spot in the room (even if it means crawling around) yields bigger improvements than any equalizer ever could. Then comes the crossover frequency, matched to the speakers’ capabilities. Next, phase, adjusted so the sub and speakers work together. And finally level, set for subtle integration rather than a display of brute force.
The ultimate test is extended listening. A well‑integrated subwoofer is only noticed when it’s off: when you switch it off, the music suddenly loses depth and weight. When it’s on, you don’t think about it. The bass enriches the soundstage without drawing attention, creating that solid foundation that turns an audio system into a true listening experience.
Frequently asked questions about subwoofers
Sealed or bass‑reflex subwoofer: what’s the difference?
A sealed subwoofer delivers faster, tighter, more detailed bass with very high precision, ideal for music. A bass‑reflex subwoofer, thanks to its ports, goes lower in frequency and produces more physical impact, excellent for home cinema.
Is a subwoofer in a small room really possible?
Yes, it is. The key is to match subwoofer size to your room volume (see table above) and place it correctly. An oversized subwoofer in a small room can cause tuning problems.
Why does my subwoofer go “boom‑boom” instead of producing tight bass?
This problem generally comes from poor placement or an overly high level. The subwoofer is exciting the room’s resonance modes. Solutions: move the subwoofer 30–45 cm away from the wall, reduce the level by 2–3 dB, check that phase is set correctly (0° or 180°), and use your receiver’s automatic calibration if available.
Should I use two subwoofers instead of one?
Two subwoofers smooth out the room’s acoustic irregularities and provide more even bass across several listening seats. Ideally, place them at the two ends of the front wall or diagonally opposite each other. This configuration increases modal density and reduces peaks and nulls in the response. Two medium subwoofers often deliver better results than one large sub.
Popular products
You may also like to read
 Best Subwoofers Under €1000: Klipsch, SVS, B&W, and FocalComparisons and buying guides
 Subwoofers: Do You Need Multiple for Optimal Sound?Comparisons and buying guides
 Where to Place Your Subwoofer for Optimal Sound?Tutorials and practical guides
 Which Subwoofer for Which Use?Comparisons and buying guides